#TP-Link Wifi Router Settings
Explore tagged Tumblr posts
Visit Tumblr Blog
Explore Tumblr blogs with no restrictions, modern design and the best experience.
Last Seen Tumblr Blogs


Fun Fact
Tumblr has 4 main sources of revenue.
Text


#seamless stretch wireless lightly lined comfo#eamless stretch wireless lightly lined comfort bra#cuddl duds intimates softwear with stretch wirefree bra on qvc#wireless mesh#seamless#best wireless mesh#wireless mesh router#best wireless router#home wireless networking#tp-link deco wireless mesh#wireless router vs mesh wifi#breezies infinite stretch brief set of 4 on qvc#anybody loungewear stretch lace bralette#breezies infinite stretch wirefree comfort bra on qvc
2 notes
·
View notes
Text


weirdo fuckin router I got, which is the TP-Link Archer R5. I've been looking for a reasonably high end WiFi 6 AP and stumbled on this used for a steal. It's so thin! It's intended to mount on a wall with tape or a mounting hook, so it flat-packs the antenna array and makes the whole thing lie up against a wall. Those are collapsing RJ45 terminals, like you find on thin laptops sometimes. Takes 12V USB-PD power! Every decision here makes sense but it's such an unusual set of design goals. I guess this is partially the logical conclusion of the Deco line of routers, which are aimed at people who don't like that their routers are huge eyesores.
Set it up and did a BeatSaber run, definitely less blocky and higher quality than when I'm using my router which has to penetrate a concrete wall. Very handy. Might set up a smart power switch to turn it off when it's not in use although I imagine its quiescent power is pretty low.
20 notes
·
View notes
Text
TOOLS FOR PERSONS WORKING ONLINE
Many persons with online jobs often have this desire to work outside. Working in nature can be reviving and a pleasant change from your work space. Sometimes the weather is nice and sunny and our backyard patio becomes that perfect place to work. However, working outside does have its fair share of challenges and this article will provide you with tips to make the process easier.
Wi-Fi Extender and Hotspot
A poor Internet connection will end your outdoor work session quickly. If you’re at home, a Wi-Fi extender may help you out if your router and modem are further away in the house. The extender will create a stronger signal and can even increase your speeds.
Should you choose to work outdoors at a coffee shop or public area, it’s smart to have a hotspot available. Actually, you may never know when the Internet might go down at your location, or you could even be surprised and find there’s no Wi-Fi connection available for use. Having access to a hotspot will ensure you’re able to be connected no matter what situation may arise.
Having a smartphone or a tablet, either of these can be tethered to your computer to provide an Internet connection. Please be aware, as these options will typically slice into your phone’s data plan plus reducing the battery life of your phone. It is important to remember that you also find mobile hotspots that are separate devices and often prepaid.
Anti-Glare Screen and Cooling Devices
Workers often find that the first problem they might have when working outside is a nasty glare on the computer screen. It often makes it difficult to see what you’re doing and cause you to squint. A shaded area is not enough to rectify this problem. Turning the screen brightness up as far as it will go will reduce the problem. It is important that you work from a cool shaded area. If shade isn’t plentiful where you’ll be working, consider wearing lighter clothing, bringing a portable mini fan, or using a cooling towel.
Extra Power Supply
A computer battery going dead is trouble. Should you head outside with a full battery, take along a power cord just in case. A portable charger is also an option, in case there are no outlets close by that can be used. Portable chargers must be charged beforehand and they can then be used to charge your computer when needed. Computer batteries don’t last all day, but depending on its condition, it may last up to two hours.
External Devices
Online jobs are challenging and persons working remotely often face issues during the scope of work. Some items are a must if you plan to work productively outdoors. Purchase a wireless keyboard and mouse, and consider a laptop stand to raise it up to eye level. These items can work wonder if you have to work outside. Please note that having a pair of headphones or earbuds will assist if you have to have to take a call or listen to music while engaging in your online work activities.
Working from a remote office can have its own set of challenges but working through the areas mentioned above will make the process easier. Carefully review these tips to take your work outside and stay industrious and driven no matter the challenges that may come up.
#health & fitness#black entrepreneurship#freelancing#marketing#black excellence#digital marketing#fitness
3 notes
·
View notes
Text
How to Fix Common Issues During WiFi Extender Setup

Problems with the TP-Link wifi extender setup? Here's how to fix typical installation issues and have your extender operating at its best.
Make sure you're connected to the extender's WiFi first if the setup page at tplinkrepeater.net won't load. Another option is to use the IP address listed on the label. Changing browsers or clearing your browser's cache can be helpful.
When users enter the incorrect WiFi password when setting up a TP-Link extender, another problem occurs. Before continuing, always make sure your credentials are correct. During the setup procedure, try moving the extender closer to the router if it is unable to locate your primary network.
Restart the router and the extension if they both display a connection, but there is no internet access. To verify that the connection was successful, repeat the TP-Link Range Extender Setup Process.
Is the extender causing slow internet? This could be the result of bad positioning. The extender should not be placed behind heavy furniture or in corners. Locate an area with a strong signal by using the LED indicators on the device.
Holding down the reset button for ten seconds will reset everything if you ever need to. Then follow the following instructions to begin again.
By following these guidelines, you can experience greater wireless coverage without any disruptions and a more seamless TP-Link wifi extender setup.
#tplinkrepeater#tplinkrepeater.net#tp link setup#tp link extender setup#tp-link wifi extender setup#tp link range extender setup#http tplinkrepeater net#tplinkrepeater login
0 notes
Text
U.S. antitrust regulators have a new target: Your cheap TP-Link router
TP-Link, that router company whose name occasionally pops up on your list of available WiFi networks, is being investigated by the U.S. government for antitrust violations. The Department of Justice is investigating TP-Link Systems, Inc. for allegedly setting router prices lower than they cost to make in order to dominate the market, according to Bloomberg. TP-Link told the outlet that it hadn’t…
0 notes
Text
Achieve Seamless Coverage With TP Link Extender Setup
Got your hands on TP link range extender and thus want a simplified and straightforward setup steps? If the answer is yes, then you are surely at the right destination. In this guide we'll share two most commonly used TP link extender setup methods. One is extremely quick that just takes less than 10 minutes. It is the WPS method. Whereas if you want a more hands on approach then Web GUI method is for you. Both the setup methods are extremely easy and can be performed without any expert help. So let's not waste any more time and dig straight into the process.
✓ Quick Setup Via WPS
Begin the process of TP Link extender setup by activating the range extender. Make sure you do this activation nearby to the host router. Meanwhile the extender is booting up, check the status of the host router. It should be actively working.
Moving further, first push the WPS key on the TP link range extender. In case the WPS LED didn't blink then push and hold the WPS key until the LED starts blinking.
Now it's time to push the WPS key on the host router. Here also make sure the WPS LED starts to blink. As this is the indication that the WPS function is enabled and the device is looking for its pair. Additionally remember, as soon as you push the WPS key on the TP link extender do not wait. Rather immediately push the WPS key on the router as well.
Now let the gadgets complete the synchronisation. As the TP Link extender setup process completes the wireless signal LED will light up. In case it doesn't light up, then it means the WPS connection has failed. So you need to redo the setup all over again. But in case everything went smooth, then it's time to relocate the extender to its desired location.
For placement select the area which is halfway from the host router and the area where you need coverage. Now as you replug the range extender, you’ll see both WPS LED as well as wireless signal LED light up. This indicates a successful setup.
✓ Manual Setup Using Web Browser
For conducting a smooth TP Link extender setup first collect the basic components and details. You need a smart gadget for initiating the setup. It can be anything like your smartphone, laptop, computer or an iPad. Next for a stable connectivity to the extender you need an Ethernet wire. Additionally, collect the username and password of your existing wifi network whose reach you want to extend. Further we advise you to keep the user manual by your side as it contains every little detail that you might need during the setup process. As you collect all these components and details, feel free to start with the setup steps:
✓ Activate The TP Link Extender
Begin the process by first bringing in the range extender to the same area where your host router is placed. Now avoiding any physical barriers plug in the range extender to activate it properly. Once done, now bring in the smart gadget. For the TP Link extender setup you need to connect this smart gadget to the extender. Now there are two methods for the same.
Either you can connect wirelessly or through ethernet wire. The details for wireless connection are written clearly on the product label which is stuck on the back panel of the extender. Additionally the details are written in the quick user manual as well. Once you build a connection between the TP Link extender and smart gadget, you can move to the next step which is Log In.
✓ Log In
To login first launch a web browser of your choice. You can go with Internet Explorer, Safari, Firefox or Google Chrome as well. Now hop on to the address field of the browser. In it fill up http://tplinkrepeater.net and press Enter. In case the web address doesn't work, then use another alternative which is http://192.168.0.254. As you press the enter key, a window pops up asking you to give in some details. So you need to enter your username and password. By default it is set to admin which you need to use in lower case only.
✓ Follow The Prompts
To complete the TP Link extender setup, now you need to follow the on-screen prompts one by one. So start by selecting the Quick Setup option and hit Next. Moving further, pick your region and hit Next. Now the web interface will automatically start scanning for the available networks. From the list choose your network name and give in its security key (password). Finally review all your settings and tap on Finish if it's appropriate. As you do so the extender will reboot itself. As it applies the changes.
Lastly, check the wireless signal LED to know whether the setup is successful or not.
0 notes
Text
Price: [price_with_discount] (as of [price_update_date] - Details) [ad_1] Product Description Easy Setup under seconds Installation Setup for Mini UPS Our Mini UPS offers a quick and easy 30-second DIY installation. Simply plug it in, and enjoy uninterrupted power for your Router. WiFi Router UPS: Oakter Mini UPS for wifi router provides upto 4 hours of power backup (depends on current consumption of wifi Router) to your 12V WiFi router, Broadband Modem. Mini UPS works as an inverter for WiFi router, Broadband modem which ensures uninterrupted power supply in case of power cuts or switch over to generators Smart UPS for WiFi Router: Mini UPS for WiFi Router having an intelligent battery management system, Mini UPS charges itself when there is electricity. Mini UPS is Online WiFi router UPS thus do not require switching between two paths in case of power failure or switch over to generators. it has inbuilt current, surge and deep discharge protection Plug-N-Play: Take out the power adapter from WiFi router and insert it in the Mini UPS input female socket, connect the "OUT" of Mini UPS to your WiFi router. Note - Use additional connector wherever require. Mini UPS is a consumer grade CE and ROHS certified. It Uses BIS Certified 2 Nos. Lithium-ion Cells (Brand: Sinohan Power Battery, Model: 18650) Supported WiFi Routers: Mini UPS for WiFi Router supports all type of 12V DC WiFi Routers, Broadband modems, Set-top box and CCTV cameras(12V-0.5A, 12V-1A, 12V-1.5A, 12V-2A, 12V-2.5A, 12V-3A). Supported all major routers like D-Link, TP-Link, Jio Fiber, Cisco, Mi, Tenda, Nokia, Asus, Linksys, airtel, BSNL, ACT, Netgear, and more except Jio Air fiber (Before buying please ensure your WiFi router is 12V DC). Post Warranty Assurance: Post 1-year Warranty, When your backup wanes simply contact our dedicated Customer Support via Whatsapp. Replacement available at 1049 INR. [ad_2]
0 notes
Photo
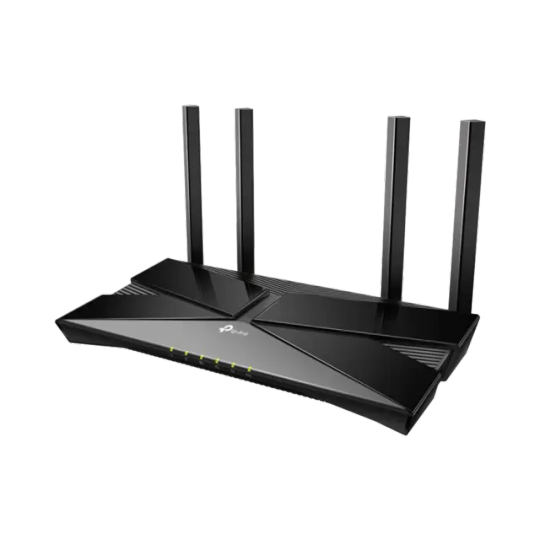
TP-Link Archer AX20 AX1800 Dual Band Wifi 6 Router FEATURES: Dual-Band Wi-Fi 6: Equipped with the latest wireless technology, Wi-Fi 6, for faster speeds, greater capacity, and reduced network congestion Next-Gen 1.8Gbps Speeds: Enjoy smooth streaming, downloading, and gaming all without buffering with Wi-Fi speeds of 1.8Gbps Connect More Devices: Wi-Fi 6 technology communicates more data to more devices using revolutionary OFDMA technology while simultaneously reducing lag Quad-Core Processing: The 1.5GHz quad-core CPU ensures communications between your router and all connected devices are smooth Extensive Coverage: Beamforming, independent FEM, and four antennas combine to deliver focused reception to devices far away Increased Battery Life: Target Wake Time technology reduces your devices’ power consumption to extend their battery life USB Easy Sharing: A USB 2.0 Port enables easy file sharing within your network or building private Cloud Storage Easy Setup: Set up your router in minutes with the powerful TP-Link Tether App Backward Compatible: Supports all previous 802.11 standards and all Wi-Fi devices WIRELESS Standards Wi-Fi 6 IEEE 802.11ax/ac/n/a 5 GHz IEEE 802.11ax/n/b/g 2.4 GHz WiFi Speeds AX1800 5 GHz: 1201 Mbps (802.11ax) 2.4 GHz: 574 Mbps (802.11ax) WiFi Range 3 Bedroom Houses 4× Fixed High-Performance Antennas Multiple antennas form a signal-boosting array to cover more directions and large areas Beamforming Concentrates wireless signal strength towards clients to expand WiFi range High-Power FEM Improves transmission power to strengthen signal coverage WiFi Capacity High Dual-Band Allocate devices to different bands for optimal performance OFDMA Simultaneously communicates with multiple Wi-Fi 6 clients Airtime Fairness Improves network efficiency by limiting excessive occupation 4 Streams Connect your devices to more bandwidth Working Modes Router Mode Access Point Mode HARDWARE Processor 1.5 GHz Quad-Core CPU Ethernet Ports 1× Gigabit WAN Port 4× Gigabit LAN Ports USB Support 1× USB 2.0 Port Supported Partition Formats: NTFS, exFAT, HFS+, FAT32 Supported Functions: Apple Time Machine FTP Server Media Server Samba Server Buttons WPS/Wi-Fi Button Power On/Off Button LED On/Off Button Reset Button Power 12 V ⎓ 1.5 A SECURITY WiFi Encryption WPA WPA2 WPA3 WPA/WPA2-Enterprise (802.1x) Network Security SPI Firewall Access Control IP & MAC Binding Application Layer Gateway Guest Network 1× 5 GHz Guest Network 1× 2.4 GHz Guest Network VPN Server OpenVPN PPTP SOFTWARE Protocols IPv4 IPv6 Parental Controls URL Filtering Time Controls WAN Types Dynamic IP Static IP PPPoE PPTP L2TP Quality of Service QoS by Device Cloud Service Auto Firmware Upgrade OTA Firmware Upgrade TP-Link ID DDNS NAT Forwarding Port Forwarding Port Triggering DMZ UPnP IPTV IGMP Proxy IGMP Snooping Bridge Tag VLAN DHCP Address Reservation DHCP Client List Server DDNS TP-Link NO-IP DynDNS Management Tether App Webpage PHYSICAL Dimensions (W×D×H) 10.2 × 5.3 ×1.5 in (260.2 × 135.0 × 38.6 mm) Package Contents Wi-Fi Router Archer AX20 Power Adapter RJ45 Ethernet Cable Quick Installation Guide OTHER System Requirements Internet Explorer 11+, Firefox 12.0+, Chrome 20.0+, Safari 4.0+, or other JavaScript-enabled browser Cable or DSL Modem (if needed) Subscription with an internet service provider (for internet access) Certifications FCC, CE, RoHS Environment Operating Temperature: 0℃~40℃ (32℉ ~104℉) Storage Temperature: -40℃~70℃ (-40℉ ~158℉) Operating Humidity: 10%~90% non-condensing Storage Humidity: 5%~90% non-condensing TEST DATA WiFi Transmission Power CE:
0 notes
Text
Tăng cường bảo mật Wifi: Hướng dẫn ẩn Wifi và các biện pháp bảo vệ hiệu quả
Trong thời đại công nghệ số, việc bảo vệ mạng Wifi gia đình trở nên quan trọng hơn bao giờ hết. Ẩn mạng Wifi là một trong những biện pháp đơn giản nhưng hiệu quả giúp ngăn chặn truy cập trái phép và bảo vệ thông tin cá nhân.
Cách ẩn Wifi cho các nhà mạng phổ biến
Dưới đây là hướng dẫn chi tiết cách ẩn Wifi cho các nhà mạng phổ biến như VNPT, Viettel và TP-Link:
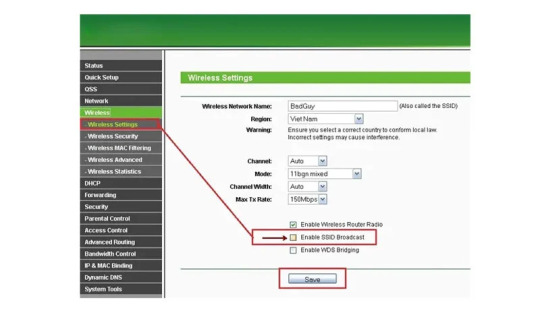
1. Ẩn Wifi TP-Link:
Truy cập trang quản lý modem bằng cách nhập địa chỉ 192.168.1.1 vào trình duyệt.
Đăng nhập với tên người dùng và mật khẩu (thường là admin/admin).
Vào mục "Wireless" -> "Wireless Settings".
Bỏ chọn "Enable SSID Broadcast" và lưu lại.
2. Ẩn Wifi VNPT:
Truy cập trang quản lý modem bằng cách nhập địa chỉ 192.168.1.1 vào trình duyệt.
Đăng nhập với tên người dùng và mật khẩu (thường là admin/admin).
Chọn "Wireless" -> "Basic".
Đánh dấu vào ô "Hide Access Point" và lưu lại.
3. Ẩn Wifi Viettel:
Truy cập trang quản lý modem bằng cách nhập địa chỉ 192.168.1.1 vào trình duyệt.
Đăng nhập với tên người dùng và mật khẩu (thường là admin/admin).
Chọn "Wireless" -> "Wireless Settings".
Bỏ chọn "Enable SSID Broadcast" và lưu lại.
Lý do nên ẩn mạng Wifi:
Ẩn mạng Wifi mang lại nhiều lợi ích bảo mật:
Hạn chế truy cập trái phép: Ẩn tên mạng (SSID) khiến người khác khó phát hiện ra mạng Wifi của bạn, giảm nguy cơ bị xâm nhập.
Tăng cường bảo mật: Ẩn SSID là một lớp bảo mật bổ sung, giúp ngăn chặn các cuộc tấn công mạng.
Giảm tải cho router: Khi mạng Wifi bị ẩn, các thiết bị lạ sẽ không tự động kết nối, giảm tải cho router và tăng hiệu suất mạng.
Các biện pháp bảo mật Wifi hiệu quả khác:
Ngoài việc ẩn Wifi, bạn nên áp dụng thêm các biện pháp bảo mật sau:
Đổi mật khẩu thường xuyên: Sử dụng mật khẩu mạnh, bao gồm chữ hoa, chữ thường, số và ký tự đặc biệt, và đổi mật khẩu định kỳ.
Sử dụng WPA2/WPA3: Đây là các chuẩn bảo mật Wifi tiên tiến, giúp mã hóa dữ liệu và ngăn chặn truy cập trái phép.
Kiểm tra thiết bị kết nối: Thường xuyên kiểm tra danh sách thiết bị kết nối với mạng Wifi, chặn các thiết bị lạ.
Tắt tính năng WPS: WPS là tính năng giúp kết nối thiết bị dễ dàng hơn, nhưng cũng có thể bị khai thác để tấn công mạng.
Kết luận:
Ẩn mạng Wifi là một biện pháp bảo mật đơn giản nhưng hiệu quả, giúp bảo vệ mạng Wifi gia đình khỏi các truy cập trái phép. Kết hợp ẩn Wifi với các biện pháp bảo mật khác sẽ giúp bạn tạo ra một mạng Wifi an toàn và đáng tin cậy.
Tìm hiểu thêm: https://vohoang.vn/cach-an-wifi
1 note
·
View note
Text


#seamless stretch wireless lightly lined comfo#eamless stretch wireless lightly lined comfort bra#cuddl duds intimates softwear with stretch wirefree bra on qvc#wireless mesh#seamless#best wireless mesh#wireless mesh router#best wireless router#home wireless networking#tp-link deco wireless mesh#wireless router vs mesh wifi#breezies infinite stretch brief set of 4 on qvc#anybody loungewear stretch lace bralette#breezies infinite stretch wirefree comfort bra on qvc
1 note
·
View note
Text
How to do TP Link Extender Setup?
To complete the TP Link extender setup, visit the user interface. To do so, you’ll require the default IP address & login credentials of your extender. After accessing the user interface, you must configure the router & WiFi settings. But if you face any TP Link setup issues, chat with our team to know how you can fix it.

0 notes
Text
A brief tutorial to Tp-link wifi extender setup
Tp-Link extenders are one of the top-mentioned range boosters that increase the network coverage of your router and eliminate dead zones in your living space. Similarly, if you buy a new extender, it is necessary to access the repeater's admin panel and perform the Tp-link wifi extender setup to utilize all of its functions.
In addition, the primary methods to set a repeater up are through the web address or the app. Likewise, both methods are convenient to use but you need to follow the steps carefully. In this brief tutorial, we explore the TP-Link repeater setup using the web address and also explain the suitable troubleshooting methods to fix the configuration errors.
Prerequisites for the Tp-link wifi extender setup
While you begin with the process of extender setup ensure you have all the necessary equipment, such as:
TP-Link WiFi extender
Stable network connection
Ethernet cable
Web address
Admin credentials
Computer/Laptop
Steps to setup the TP-Link extender
In this section, we briefly explore the steps to begin and complete the setup procedure. All you need is a stable internet connection, for this, you can also opt for a wired connection using an Ethernet cable. Now, let’s move towards the steps to configure your range extender:
First and foremost, plug your range extender and power it on.
Now, ensure that your computer is connected to the extender network.
Next, open the web browser and type the tplinkextender.net web address or 192.168.1.1 IP address.
Hereon, a login window appears to you on the screen.
Further, mention the username and password here.
After that, click on Quick Set Up> Next> Select your Region> Next.
Here, your extender scans for the available networks, so wait patiently.
After scanning, you have to check the list of available networks and select the one you want to go ahead with.
After that, tap on Next and another window displays the password of your selected network.
After typing the password, click on the Copy from the main router to continue with the single network or click on Customize to create a different network.
Further, tap on Next> Finish.
Lastly, you have completed the TP-link extender setup successfully, now continue error-free browsing.
How to troubleshoot the TP-Link extender setup issues?
Additionally, the setup issues are common when a non-tech person configures his repeater for the first time. These can be due to incorrect IP addresses, login details, unstable networks, or faulty hardware. So, the primary thing is to fix these issues but how? No worries! We explain here:
Check the admin details you enter to access the web interface of the extender.
Also, enter the correct web or IP address to continue with the setup process.
Examine the network cables you use for a wired connection. Replace if there is any damaged cable preset.
Ensure your internet connection is stable.
Look at the extender network that is connected to your smart device is active properly.
Fix the browser issues and update if needed.
Ensure an adequate power supply on your range booster.
All in all, the information we share with you will assist you in carrying out the Tp-link wifi extender setup process easily. Similarly, if you have issues with the configuration process of your range booster, then walk through our troubleshooting section. If need more info, then stay tuned to our website.
#Tp-link wifi extender setup#Troubleshooting tp-link setup issues#tp-link extender setup#tplinkextender
0 notes
Text
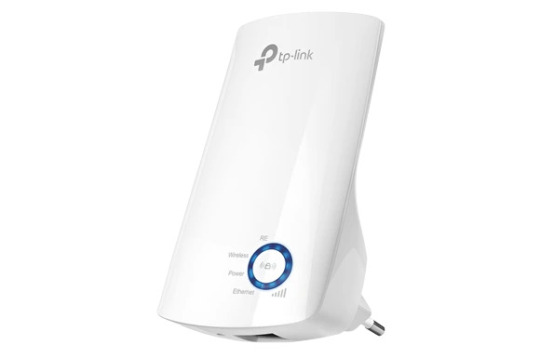
👉 TP-Link N300 WiFi Extender(RE105)
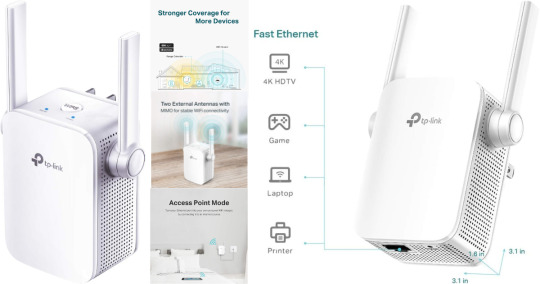
TP-Link N300 WiFi Extender(RE105), WiFi Extenders Signal Booster for Home, Single Band WiFi Range Extender, Internet Booster, Supports Access Point, Wall Plug Design, 2.4Ghz only
Brand 👉 TP-Link
Wireless Communication Standard 👉 802.11n, 802.11b, 802.11a, 802.11g
Data Transfer Rate 👉 300 Megabits Per Second
Frequency Band Class 👉 Single-Band
Connector Type 👉 RJ45
CLICK HERE TO GET INSTANT ACCESS NOW >>
About this item
Extend WiFi Coverage - Boost Internet WiFi coverage with 2 external antennas for more reliable Wi-Fi, compatible with any WiFi Router, Gateway, Access Point
More than a WiFi Repeater - RE105 also supports AP mode which creates a new Wi-Fi Access point for home
Fast Ethernet Port - Experience wired speed and reliability anywhere in your home by connecting your favorite device to the fast ethernet port
Better Range with External Antennas - Two external antennas with MIMO technology for improved range versus standard range extenders
Set Up in Minutes - Easily set up and manage your WiFi in a few quick and easy steps using the TP-Link Tether app (Android, iOS). Find the optimal location for the best WiFi connection with an intelligent signal indicator
All WiFi extenders are designed to increase or improve WiFi coverage, not to directly increase speed. In some cases improving signal reliability can affect overall throughput
If you experience any trouble during or after set up, please contact us. TP-Link offers a 2 year warranty and 24/7 technical Support
CLICK HERE TO GET INSTANT ACCESS NOW >>
The TP-Link N300 WiFi Extender, also known as the TP-Link TL-WA855RE, is a popular Wi-Fi range extender designed to enhance and extend the wireless network coverage in your home or office. Here are some key features and functions of this device:
1. Wi-Fi Range Extension: The TP-Link N300 WiFi Extender is designed to boost the existing Wi-Fi signal in areas with weak or no coverage, effectively expanding the wireless network's reach.
2. N300 Wireless Speed: This extender supports wireless speeds of up to 300Mbps on the 2.4GHz frequency band, which is suitable for general web browsing, email, and streaming.
3. External Antennas: The device is equipped with two external antennas that help improve Wi-Fi coverage and signal strength.
4. One-Button Setup: The extender offers a simple one-button setup process, making it easy for users to connect to their existing Wi-Fi network.
5. Ethernet Port: It comes with an Ethernet port, allowing you to connect wired devices like gaming consoles, smart TVs, or desktop computers directly to the extender for a more stable connection.
CLICK HERE TO GET INSTANT ACCESS NOW >>
6. LED Signal Indicator: The device features LED signal strength indicators, helping you find the optimal location for the extender to achieve the best coverage.
7. Access Point Mode: In addition to extending Wi-Fi range, the TP-Link N300 extender can be configured as an access point, creating a new wireless network from a wired connection.
8. WPA/WPA2 Encryption: The extender supports WPA/WPA2 security encryption to protect your network from unauthorized access.
9. Compatibility: It is compatible with most standard routers, access points, and Wi-Fi devices, making it a versatile solution for extending your network.
10. Tether App: TP-Link offers the "Tether" app, which allows you to manage and configure your extender from your smartphone.
The TP-Link N300 WiFi Extender is a cost-effective solution for improving Wi-Fi coverage and eliminating dead zones in your home or office. It can be especially useful in larger homes or spaces where the primary router's signal doesn't reach every area. When installing the extender, it's essential to place it in a location where it can still receive a strong Wi-Fi signal from your main router while providing better coverage to the areas you want to reach.
CLICK HERE TO GET INSTANT ACCESS NOW >>
#TPLinkN300WiFiExtender#TPLinkN300WiFiExtenderReview#TPLinkN300WiFiExtenderReviews#TPLinkN300WiFiExtenderBrand#TPLinkN300WiFiExtenderGoodorBad#TPLinkN300WiFiExtenderAmazon#TPLinkN300WiFiExtenderFeatures#TPLinkN300WiFiExtenderPrice#TPLinkN300WiFiExtenderInboxing#HowtobuyTPLinkN300WiFiExtender#HowtogetTPLinkN300WiFiExtender#TPLinkN300WiFiExtenderWalkthrough#TPLinkN300WiFiExtenderWorks#affiliatemarketing#marketing#amazon#amazondeals#onlinemarketing#amazonfinds#amazonprime
0 notes
Text
How To Boost Your TP-Link Extender WiFi Signal?
Looking for how to boost your TP-Link Extender WiFi signal for better coverage? Begin by placing the extender between your router and the area with a weak signal. Ensure it's in the optimal location. Access the extender's web interface using a web browser and the IP address (commonly "192.168.0.1"). Log in, navigate to Wireless Settings, and select your existing Wi-Fi network. Increase the extender's transmission power if available. Also, consider updating firmware and securing the extender. These steps can significantly improve your TP-Link Extender's WiFi signal strength and coverage.
0 notes
Text
How to install TP-Link wireless router | +1-800-487-3677 | Tp-link Guide

We at tp-link support provide the best technical solution for Router Setup, router login password reset and all kinds of troubleshooting with wireless tp link router. You may call on our toll free : +1-800-487-3677.
Content : You've purchased a TP-Link Router and can hardly hold on to have your new web speed. In this article, we'll make sense of in 4 stages how for set up your switch. What's more, we've recorded the most widely recognized inquiries for you. Like that, you should rest assured that you can utilize your switch ideally.
Stage 1: track down the best spot for your switch
Stage 2: associate your links to the switch
Stage 3: actually take a look at the lights in your switch
Stage 4: sign in to your switch and set up your organization
1
Track down the best spot for your switch
Contemplate where you need to put the switch before you set it up. You'd, all things considered, need to put your switch in a focal spot. On the off chance that you have a house with 3 stories, you ideally put it on the subsequent floor. You could require a more extended Ethernet link to interface your modem to your switch. Ensure you don't mount the switch before you've tried the speed in the house. Perhaps you need to put it closer towards your concentrate after the test.
2
Interface links to the switch
Mount your switch or put it down with the receiving wires facing up. Then, interface the Ethernet link of your modem or from the wall to the WAN port of your switch. This is the orange Ethernet port. Boot your modem once more and associate the power connector to your switch. Sit tight two or three minutes for the power light to be on ceaselessly.
3
Reset your switch in the event that the establishment doesn't work
Sign in to your WiFi organization
Still don't have a remote association with your switch? Interface your gadget to one of the LAN ports of your Bowman through an organization link. You ought to likewise check whether the initial 4 lights of your switch are still on. Provided that this is true, reset the switch again with the reset button. You'll track down this button on the rear of your switch. This little button is right underneath the WPS button.
For more info you may call on our toll free :+1-800-487-3677
1 note
·
View note
Text
Price: [price_with_discount] (as of [price_update_date] - Details) [ad_1] Product Description Easy Setup under seconds Installation Setup for Mini UPS Our Mini UPS offers a quick and easy 30-second DIY installation. Simply plug it in, and enjoy uninterrupted power for your Router. WiFi Router UPS: Oakter Mini UPS for wifi router provides upto 4 hours of power backup (depends on current consumption of wifi Router) to your 12V WiFi router, Broadband Modem. Mini UPS works as an inverter for WiFi router, Broadband modem which ensures uninterrupted power supply in case of power cuts or switch over to generators Smart UPS for WiFi Router: Mini UPS for WiFi Router having an intelligent battery management system, Mini UPS charges itself when there is electricity. Mini UPS is Online WiFi router UPS thus do not require switching between two paths in case of power failure or switch over to generators. it has inbuilt current, surge and deep discharge protection Plug-N-Play: Take out the power adapter from WiFi router and insert it in the Mini UPS input female socket, connect the "OUT" of Mini UPS to your WiFi router. Note - Use additional connector wherever require. Mini UPS is a consumer grade CE and ROHS certified. It Uses BIS Certified 2 Nos. Lithium-ion Cells (Brand: Sinohan Power Battery, Model: 18650) Supported WiFi Routers: Mini UPS for WiFi Router supports all type of 12V DC WiFi Routers, Broadband modems, Set-top box and CCTV cameras(12V-0.5A, 12V-1A, 12V-1.5A, 12V-2A, 12V-2.5A, 12V-3A). Supported all major routers like D-Link, TP-Link, Jio Fiber, Cisco, Mi, Tenda, Nokia, Asus, Linksys, airtel, BSNL, ACT, Netgear, and more except Jio Air fiber (Before buying please ensure your WiFi router is 12V DC). Post Warranty Assurance: Post 1-year Warranty, When your backup wanes simply contact our dedicated Customer Support via Whatsapp (+91 7575040506). Replacement available at 1049 INR. [ad_2]
0 notes